
Congratulations on your purchase and welcome to Philips! To fully benefit from the support that Philips offers, register your product at www.philips.com/welcome.
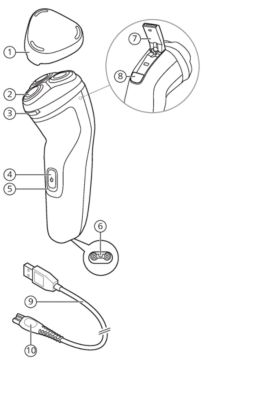
- Protection cap
- Shaving unit
- Shaving unit release button
- On/off button
- Charging light
- Socket for small plug
- Trimmer release slide switch
- Pop-up trimmer
- USB cable
- Note: A suitable supply unit (e.g. Philips HQ87) is available via www.philips.com/support.
- Small plug
Only use the product for its intended purpose. Read this important information carefully before you use the product and its batteries and accessories, and save it for future reference. Misuse can lead to hazards or serious injuries.
Warning
- To charge the product, only use a certified safety extra low voltage (SELV) supply unit with output rating 5 V, ≥ 1 A. For safe charging in a moist environment (e.g. in a bathroom), only use an IPX4 (splash-proof) supply unit. A suitable supply unit (e.g. Philips HQ87) is available via www.philips.com/support. If you need support finding the correct USB supply unit, contact the Consumer Care Center in your country (see the international warranty leaflet for contact details). Using a non-certified supply unit may cause hazards or serious injuries.
- Keep the USB cable and the USB supply unit dry.
-
- This shaver is waterproof. It is suitable for use in the bath or shower and for cleaning under the tap. For safety reasons, the shaver can therefore only be used without cord.
- This appliance can be used by children aged from 8 years and above and persons with reduced physical, sensory or mental capabilities or lack of experience and knowledge if they have been given supervision or instruction concerning use of the appliance in a safe way and understand the hazards involved. Children shall not play with the appliance. Cleaning and user maintenance shall not be made by children without supervision.
- Do not modify the supply unit.
- Do not use the supply unit in or near wall sockets that contain an electric air freshener to prevent irreparable damage to the supply unit.
- Do not use a damaged appliance. Replace damaged parts with new Philips parts.
- Because of hygiene, only one person should use the appliance.
- Unplug the appliance before cleaning it with water.
- Only use cold or lukewarm water to clean the appliance.
- Never use compressed air, scouring pads, abrasive cleaning agents or aggressive liquids to clean the appliance.
- Water may drip from the socket at the bottom of the shaver when you rinse it. This is normal and not dangerous because all electronics are enclosed in a sealed power unit inside the shaver.
Electromagnetic fields (EMF)
This Philips appliance complies with all applicable standards and regulations regarding exposure to electromagnetic fields.
Battery fully charged
When the battery is fully charged, the charging light lights up white continuously.
Note: After approx. 30 minutes, the charging light goes out to save energy.
Battery low
When the battery is almost empty (when there are only 5 or fewer shaving minutes left), the charging light flashes orange.
When you switch off the product, the charging light continues to flash orange for a few seconds.
Charging
When the shaver is charging, the charging light flashes white.
Quick charge
When you start charging the empty battery, the charging light flashes white quickly. After approx. 5 minutes the charging light flashes white slowly. The shaver now contains enough energy for a 5-minute shave.
Charge the shaver before you use it for the first time and when the charging light indicates that the battery is almost empty.
When you charge the shaver for the first time or after a long period of disuse, let it charge until the charging light lights up continuously.
- Charging takes approx. 1 hour.
- Quick charge: After approx. 5 minutes of charging, the battery contains enough energy for one full shave.
- A fully charged shaver has a shaving time of up to 40 minutes (X3001, X3002 and X3003 only) or 45 minutes (X3051, X3052 and X3053 only).
Note: You cannot use the appliance while it is charging.
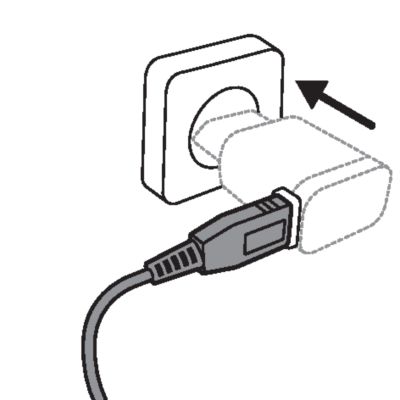
Charging with a USB supply unit
Warning: Keep the USB cable and the USB supply unit dry.
- Make sure that the appliance is switched off.
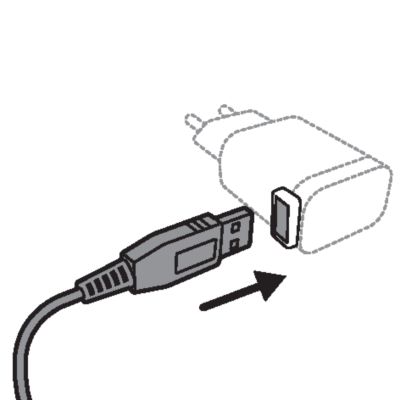
- Insert the small plug of the USB cable into the socket in the bottom of the appliance.
-
- Insert the USB plug into the USB supply unit (not provided).
-
- Insert the USB supply unit into the wall socket.
- The charging light shows the charging status of the appliance.
- After charging, remove the USB supply unit from the wall socket, pull the USB plug out of the supply unit and then pull the small plug out of the appliance.
Warning: Always check the appliance and all accessories before use. Do not use the appliance or any accessory if it is damaged, as this may cause injury. Always replace a damaged part with one of the original type.

Note: This appliance is waterproof. It is suitable for use in the bath or shower and for cleaning under the tap. For safety reasons, the appliance can therefore only be used without cord.
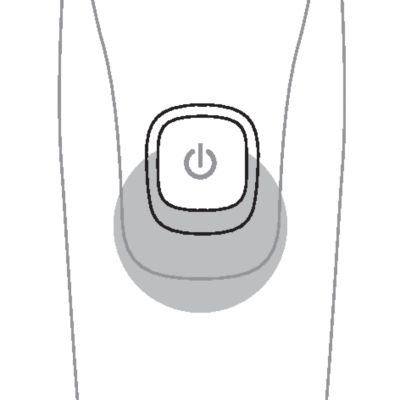
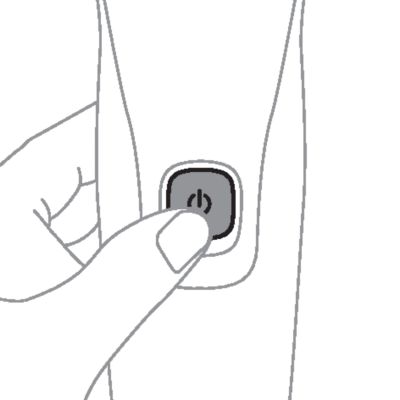
Switching the appliance on and off
-
- To switch on the appliance, press the on/off button once.
-
- To switch off the appliance, press the on/off button once.
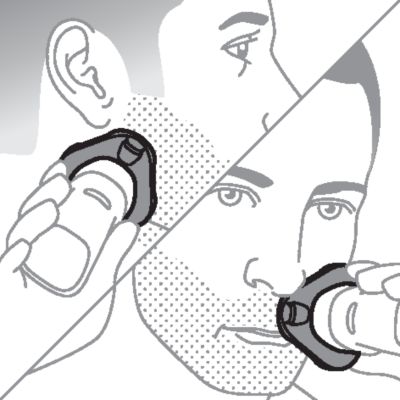
Shaving
For the best results on skin comfort, pre-trim your beard if you have not shaved for 3 days or longer.
You can use this appliance either wet or dry, or even in the shower. For a wet shave, apply some water and shaving foam or gel to your skin and rinse the shaving heads under the tap with warm water before following the steps below.
- Switch on the appliance.
-
- Move the shaver in circular movements over your skin to catch hair growing in all directions. Make sure each shaving head is fully in contact with the skin. Exert gentle pressure for a close, comfortable shave.
- Note: Do not press too hard, as this can cause skin irritation.
-
- Note: If you are shaving with gel or foam, rinse the shaving unit regularly during your shave to ensure that it continues to glide smoothly over your skin.
-
- Use the narrow sides of the shaving unit to shave in hard-to-reach areas such as along your jawline and under your nose.
- Switch off and clean the appliance after each use.
-
- Put the protection cap on the shaver after use to prevent damage and dirt accumulation in the shaving heads.

Note: Make sure you rinse all foam or shaving gel off the appliance.
Skin adaptation period
Trimming with pop-up trimmer
You can use the trimmer to groom your sideburns and moustache.
-
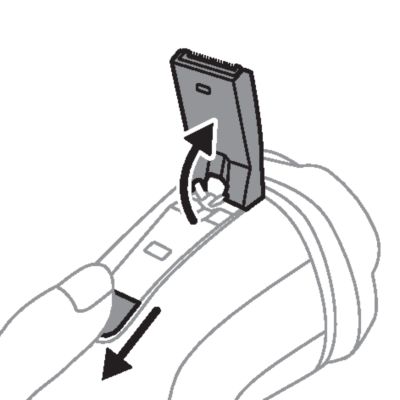
- Push the trimmer release slide downwards to open the trimmer.
- Switch on the appliance.
-
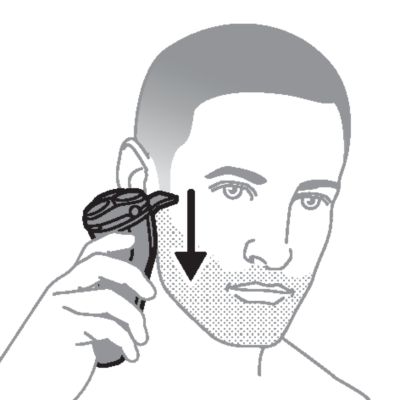
- Hold the trimmer perpendicular to the skin and move the appliance downwards while you exert gentle pressure.
- Switch off the appliance and clean the trimmer after each use to prevent clogging and damage.
-
- Close the trimmer ('click').
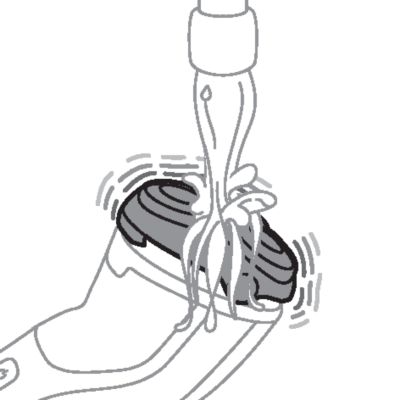
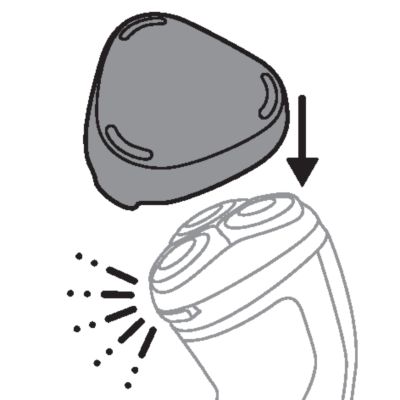
Cleaning the shaving unit under the tap
Clean the shaver after every shave for optimal shaving performance.
Water may drip from the socket at the bottom of the shaver when you rinse it. This is normal and not dangerous because all electronics are enclosed in a sealed power unit inside the shaver.
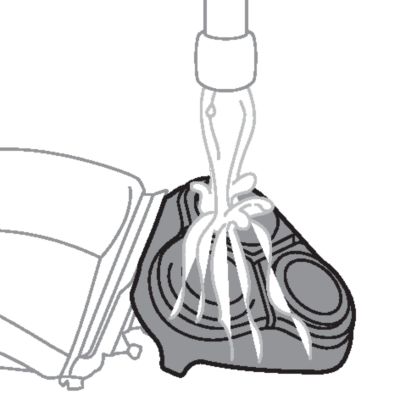
- Switch on the shaver.
-
- Rinse the shaving unit with cold or lukewarm water.
-
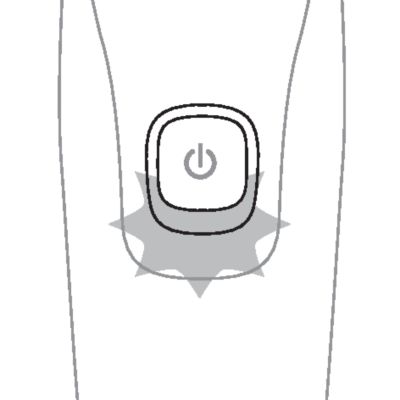
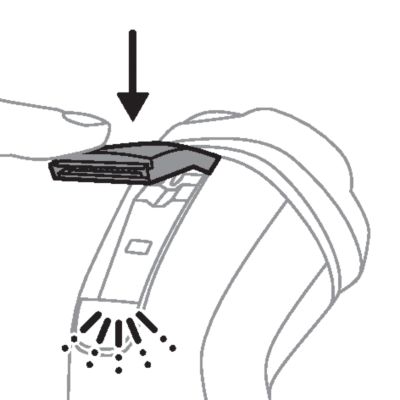
- Switch off the shaver. Press the shaving unit release button to open the shaving unit.
-
- Rinse the shaving unit and hair chamber with lukewarm water.
-
- Rinse the outside of the shaving unit with lukewarm water.
- Carefully shake off excess water and let the shaver air dry.
-
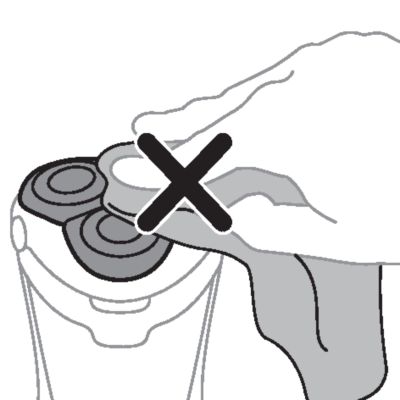
- Caution: Never dry the shaving unit with a towel or tissue, as this may damage the shaving heads.
- Close the shaving unit.
Cleaning the pop-up trimmer
Caution: Never dry the trimmer teeth with a towel or tissue, as this may damage the trimmer teeth.
Clean the trimmer after each use to prevent clogging and damage.
- Switch off the shaver.
-
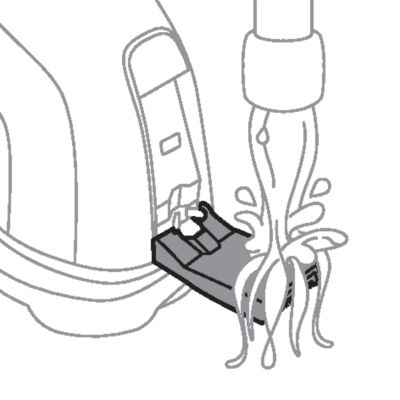
- Push the trimmer release slide downwards to open the trimmer.
-
- Switch on the shaver and rinse the pop-up trimmer under warm water.
- Switch off the shaver after cleaning.
- Carefully shake off excess water and let the pop-up trimmer air dry.
-
- Close the trimmer ('click').
- Tip: For optimal performance, lubricate the teeth of the pop-up trimmer with a drop of mineral oil every six months (oil not included).
Thorough cleaning
Clean the shaving heads thoroughly once a month for optimal performance.
- Switch off the shaver.
-
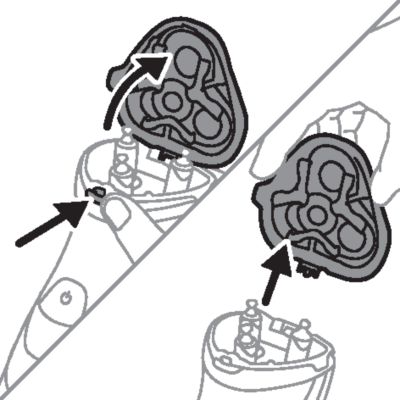
- Press the shaving unit release button to open the shaving unit. Pull the shaving unit off the shaver.
-
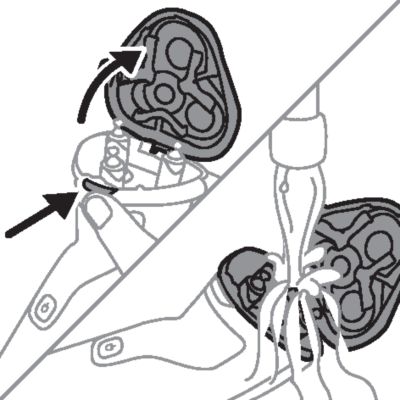
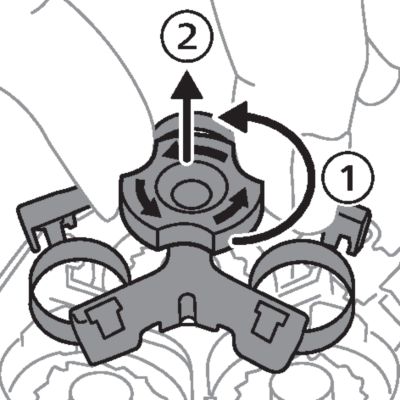
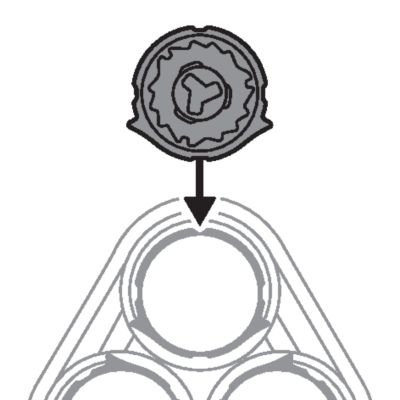
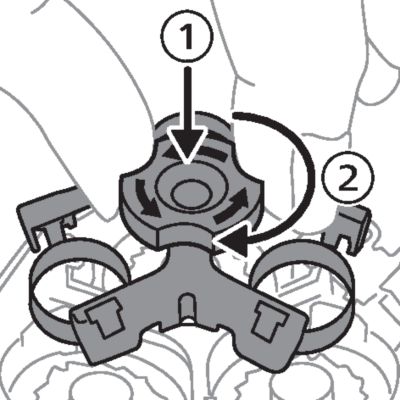
- Turn the lock counterclockwise and remove the retaining frame. Place it aside in a safe place.
-
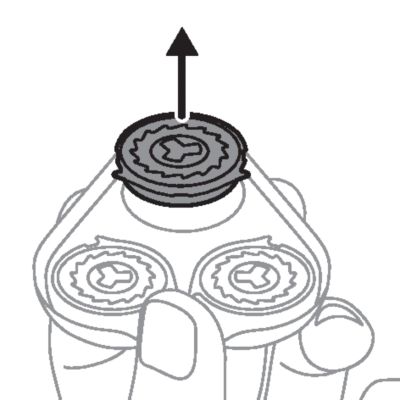
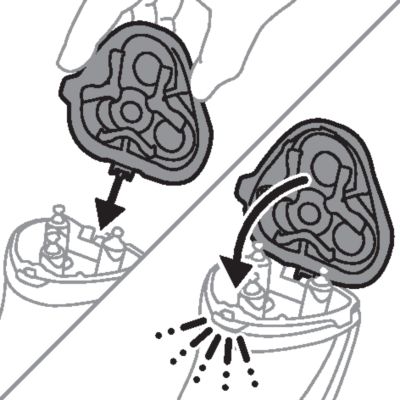
- Remove and clean one shaving head at a time. Each shaving head consists of a cutter and a guard.
- Note: Do not clean more than one cutter and guard at a time, since they are all matching sets. If you accidentally mix up the cutters and guards, it may take several weeks before optimal shaving performance is restored.
-
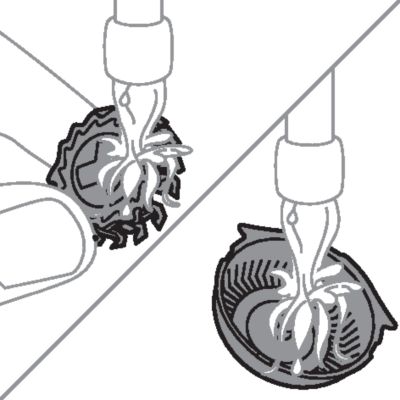
- Remove the cutter from the shaving guard and clean both parts under the tap.
-
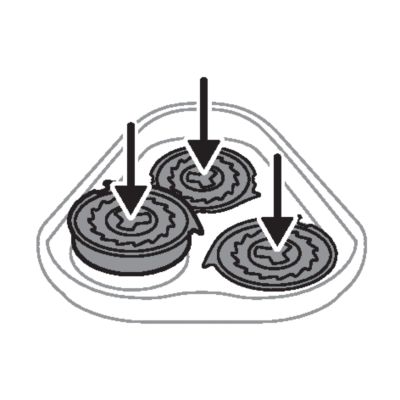
- Put the cutter back into the guard.
-
- Put the shaving heads back into the shaving unit.
-
- Note: Make sure that the shaving heads with the projections fit exactly onto the hooks of the shaving head holder when placing them. The shaving heads supplied with the shaver either have notches or projections. Both shaving systems are the same.
-
- Put the retaining frame back into the shaving unit and turn the lock clockwise.
-
- Insert the hinge of the shaving unit into the slot in the top of the shaver. Then close the shaving unit.
- Note: If the shaving unit does not close smoothly, check if you have inserted the shaving heads properly and if the retaining frame is locked.


For maximum shaving performance, we advise you to replace the shaving heads every two years. Replace damaged shaving heads immediately. Always replace the shaving heads with original Philips shaving heads.
- Switch off the shaver.
-
- Press the shaving unit release button to open the shaving unit. Pull the shaving unit off the shaver.
-
- Turn the lock counterclockwise and remove the retaining frame. Place it aside in a safe place.
-
- Remove the shaving heads from the shaving unit. Discard the used shaving heads immediately to avoid mixing them with the new shaving heads.
-
- Place new shaving heads in the shaving unit.
-
- Note: Make sure that the shaving heads with the projections fit exactly onto the hooks of the shaving head holder when placing them. The shaving heads supplied with the shaver either have notches or projections. Both shaving systems are the same.
-
- Put the retaining frame back into the shaving unit and turn the lock clockwise.
-
- Insert the hinge of the shaving unit into the slot in the top of the shaver. Then close the shaving unit.
- Note: If the shaving unit does not close smoothly, check if you have inserted the shaving heads properly and if the retaining frame is locked.
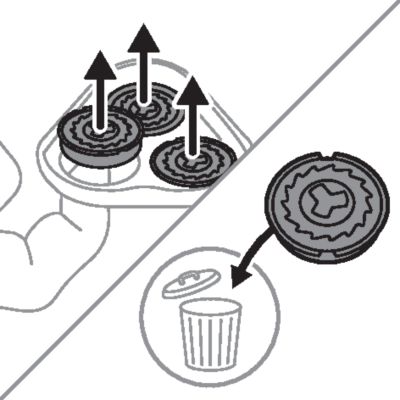
Put the protection cap on the shaver to prevent damage.
Note: Always let the shaver dry completely before storing.
To buy accessories or spare parts, visit www.philips.com/parts-and-accessories or go to your Philips dealer. You can also contact the Philips Consumer Care Center in your country (see the international warranty leaflet for contact details).
For all product support such as frequently asked questions, please visit www.philips.com/support.